Introduction
Most residential internet connection use a dynamic public IP address. This means that your ISP can change your public IP at any time, making it difficult to access self-hosted services consistently.
I already used Cloudflare to manage the DNS for my personal website, so when I needed a Dynamic DNS solution for my homelab, it made sense to use the tools I already had. Rather than paying my ISP for a static public IP or signing up for another DDNS provider, Cloudflare’s free API allowed me to keep my home server reachable through a permanent domain name. Whenever my home IP changes, a small script automatically updates the DNS record in Cloudflare.
In this guide, I’ll show you how to set up Cloudflare DDNS for your homelab using a Linux server.
Why Use Cloudflare DDNS?
I was already using Cloudflare as the authoritative DNS provider for my personal website by pointing my domain’s nameservers to Cloudflare. Since my DNS records were already managed in one place, setting up Dynamic DNS through Cloudflare was the most logical choice.
Using Cloudflare for Dynamic DNS offers several benefits:
- Free to use
- Fast and reliable DNS
- Easy API integration
- Works well with homelab environments
- Supports proxying and additional security features
Prerequisites
Before starting, ensure you have:
- A domain name added to Cloudflare
- Access to the Cloudflare Dashboard
- A Linux server that runs continuously
- Basic familiarity with the terminal
Step 1: Create a DNS Record
In Cloudflare:
- Navigate to DNS.
- Create an A Record.
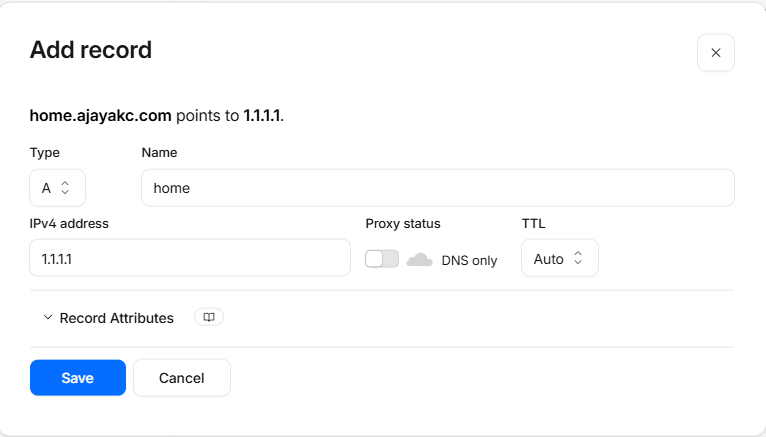 The IP address is only temporary and will be updated automatically later.
Step 2: Create a Cloudflare API Token
Navigate to:
My Profile → API Tokens → Create Token
Use the Edit Zone DNS template.
Grant permissions:
- Zone → DNS → Edit
- Zone → Zone → Read
Limit the token to your specific domain.
Save the token securely, as it will only be displayed once.
Step 3: Deploying Cloudflare DDNS with Docker Compose
Since I already use Docker to manage services in my homelab, I chose to run Cloudflare DDNS as a container.
First create the following directory
mkdir ~/cloudflare-ddns
cd ~/cloudflare-ddns
Create a compose.yaml file with your favorite text editor
nano compose.yaml
Now paste the following in the compose file
services:
  cloudflare-ddns:
    image: favonia/cloudflare-ddns:latest
    # Choose the appropriate tag based on your need:
    # - "latest" for the latest stable version (which could become 2.x.y
    #   in the future and break things)
    # - "1" for the latest stable version whose major version is 1
    # - "1.x.y" to pin the specific version 1.x.y
    network_mode: host
    # This bypasses network isolation and makes IPv6 easier (optional; see below)
    restart: always
    # Restart the updater after reboot
    user: "1000:1000"
    # Run the updater with specific user and group IDs (in that order).
    # You can change the two numbers based on your need.
    read_only: true
    # Make the container filesystem read-only (optional but recommended)
    cap_drop: [all]
    # Drop all Linux capabilities (optional but recommended)
    security_opt: [no-new-privileges:true]
    # Another protection to restrict superuser privileges (optional but recommended)
    environment:
      - CLOUDFLARE_API_TOKEN="YOUR_CLOUDFLARE_API_TOKEN"
        # Your Cloudflare API token
      - DOMAINS=home.example.com
        # Your domains (separated by commas)
Replace:
YOUR_CLOUDFLARE_API_TOKENhome.example.comwith your own values and save the file
Step 4: Start the server
Run:
docker-compose up -d
You should see the container start successfully.
Verify that it is running:
docker ps

Step 4: Verify DNS Updates
Check the container logs:
docker logs -f cloudflare-ddns
If everything is configured correctly, you’ll see messages indicating that the updater has checked your public IP and updated Cloudflare if necessary.
🌐 Detected the IPv4 address 21.23.23.1

🤷 The A records of home.example.com are already up to date (cached)

😞 Failed to detect the IPv6 address

⏰ Checking the IP addresses in about 4m55s . . .

🌐 Detected the IPv4 address 21.23.23.1

🤷 The A records of home.example.com are already up to date (cached)

😞 Failed to detect the IPv6 address

⏰ Checking the IP addresses in about 4m55s . . .
You can also verify that your DNS record resolves correctly:
Using dig:
dig home.example.com
Or using nslookup:
nslookup home.example.com
The returned IP should match your current public IP address.
How It Works
The Cloudflare DDNS container periodically checks your public IP address.
If your ISP assigns a new IP address, the container automatically updates the corresponding DNS record in Cloudflare using the API token you provided.
The process looks like this:
Internet
    ↓
Cloudflare DNS
    ↓
Your Domain Name
    ↓
Cloudflare DDNS Container
    ↓
Cloudflare API
    ↓
Updated DNS Record
    ↓
Home Server
This allows your domain name to continue pointing to your home server, even when your public IP changes.
One of the reasons I chose this approach is that it aligns with the rest of my Docker-based homelab. I can manage Cloudflare DDNS alongside my other containers using the same workflow and without relying on external scripts or cron jobs.
Conclusion
Since I was already using Cloudflare to host my website’s DNS, using Cloudflare DDNS was a natural extension of my existing setup.
For anyone running a homelab with Docker, this is a simple project that improves the reliability and accessibility of self-hosted services while keeping everything managed from a single platform.